آموزش outline در CSS
در این آموزش قصد داریم با outline آشنا بشیم. نوع تعاریفی که برای outline وجود دارد مثله border است. با این تفاوت که به جای کلمه border از outline استفاده میکنیم. ولی در بخش نمایش، این دو با هم تفاوت هایی دارند.
به مثال زیر دقت کنید.
<!DOCTYPE html>
<html>
<head>
  <title>lesson</title>
  <meta charset="utf-8">
  <link rel="stylesheet" type="text/css" href="lesson.css">
</head>
<body>
  <div class="test">
      hello world!<br>
      hello world!<br>
      hello world!
  </div>

  <div class="test">
      hello world!<br>
      hello world!<br>
      hello world!
  </div>

  <div class="test">
      hello world!<br>
      hello world!<br>
      hello world!
  </div>

  <div class="test">
      hello world!<br>
      hello world!<br>
      hello world!
  </div>
</body>
</html>
.test:nth-child(2n){
  background-color: red;
}

.test:nth-child(2n+1){
  background-color: yellow;
}

.test{
  margin: 20px;
  border-radius: 10px;
  padding: 20px;
}

div:hover{
  margin: 30px;
  color: blue;
}
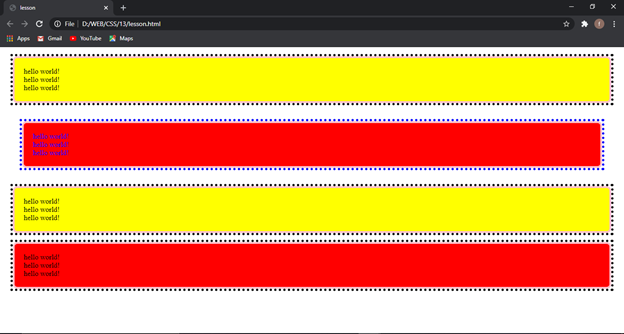
حال بیاید outlineی تعریف کنیم با ویژگی dotted به رنگ مشکی و همچنین در حین hover رنگ outline به رنگ آبی تغییر کند. میتوانید با سر زدن به آموزش border ها، طریقه درست تعریف را آموزش ببینید و فقط به جای کلمه border از outline استفاده میکنیم.(click here)
.test:nth-child(2n){
background-color: red;
}
.test:nth-child(2n+1){
background-color: yellow;
}
.test{
margin: 20px;
border-radius: 10px;
padding: 20px;
outline: black dotted 5px;
}
div:hover{
margin: 40px;
color: blue;
outline-color: blue;
}
حال بیاید هم زمان یک boder به رنگ صورتی تشکیل دهید تا به صورت دقیق تر تفاوت border و outline را متوجه شوید.
.test:nth-child(2n){
  background-color: red;
}

.test:nth-child(2n+1){
  background-color: yellow;
}

.test{
  margin: 20px;
  border-radius: 10px;
  padding: 20px;
  outline: black dotted 5px;
  border: pink solid 4px;
}

div:hover{
  margin: 40px;
  color: blue;
  outline-color: blue;
}

همانطور که میبینید outline با فاصله بیشتری از border قرار میگیرد.
برای دیدن آموزش های بیشتر جزوات CSS را دنبال کنید.

